
How to generate sail power simply. And how the normal “Points of Sail” are overly complicated. We vastly simplify the introductory parts found is most sailing books here – why learn lists of terminology that don’t’ actually help you sail well. This is an introductory section of our free online sailing lessons
How to get power from the sail quickly and simply in this lesson is easier than the normal explanation and works on direct feedback of power and acceleration when you get it right. Yes – you can feel it.

Finding Power is also a way of controlling power.
It is way easier than almost any sailing lesson book would say.
Because they start in the wrong place.
All Free Online Sailing Lessons – Index
- Sailing Upwind with less effort
- Increase confidence in Stronger Winds
- Downwind with less distress
- Gusts, Gybes and tacks easily
- Not hitting other boats and more

Preparing the boat – Safety knot in mainsheet.
This is MUCH more important than it seems. Not only for boat control but to simplify the following explanation of how to use a sail to get power.
Basically we want the sail and boom to have a maximum “out” position a bit less than 90 degrees. Just like below. Don’t overdo it.
If your boat has stays (wires holding up the mast) tie the safety knot in the sheet to keep the boom just away from the wire by 20mm or an inch.
Purple line is the mainsheet.

Figure 8 Knot (Safety knot in sheets)
This is the “Figure 8 Knot” and here is are VIDEOS on how to tie it and the other important knots.

First – how do you get power from the sail – relationship of sail to wind direction.
This diagram is going to reappear again and again – because it is so fundamental. You can try this on shore first.

1/ On the left of the drawing above – Sail is flapping and boom should be blowing out to the side of the boat
2/ Start pulling in the sail and the flapping reduces. But there is still some flapping or a reversed shape at the front of the sail. This is termed Luffing (VIDEO below) . The front of the sail is called the Luff (noun). And when we get this reverse curve along the front edge of the sail we get the adjective and verb – Luffing. When sailing with the sail luffing, there will be modest speed but you will feel the boat is slow.
There will be modest speed but you will feel the boat is slow.
Video image can take a moment to load.
3/ Pull on a little bit more and the luffing has just disappeared. Stop as soon as the luffing disappears. This is maximum power. When sailing you will feel it as a KICK and the boat quickly accelerates up to maximum speed. It is something you feel easily. Our aim is to get familiar with that KICK and sail in that zone continuously.
Whatever the direction the boat is travelling in – if the sail is trimmed so the luffing just barely disappears …
… the sail is now at maximum power …
… and the boat will tell you by accelerating and feeling lively. FEEL IT – WE CALL IT THE KICK!
4/ The last image is when the sail is pulled in further – the power feels better for a moment but then the power starts dropping and the boat slows and slows and slows. It is called OVERsheeting. THIS IS HOW MOST INTERMEDIATE AND BEGINNER SAILORS sail around – they think they are doing well … But they are sailing at 1/2 or 1/3 speed.
They might not get home and the boat will be really hard to handle if the wind gets stronger. But all they have to do is ease the sail to find luffing and pull it in to get the KICK again.
What to do when the boat feels slow or sluggish?
Avoid the first instinct which is to pull the sail tighter.
Your new first instinct is to ease the sail out until you see a little bit of luffing …
… and then pull the sail in smoothly and slowly to remove the luffing …
… you will feel a distinct KICK of power and the boat will accelerate.
A new version of the points of sail – getting rid of the most stupid diagram in Sailing

Often in a first sailing lesson you will see a diagram like the one I have fuzzed right.
I HATE this diagram with a passion. It has one useful fact and dozens of confusing words which are not needed at the beginning.
But the WORST SIN is it seems to indicate that there are HALF A DOZEN WAYS to trim a sail.
When there is only ONE!
- There is only one way to trim a sail.
- There is no need to know the wind direction – the sail will find it for you.
- There is not one theoretical correct wind direction as suggested by the diagram
- It blocks the beginner from FEELING the easily perceived changes in power and speed because the diagram indicates it is “seen” and “thought”. And it is this FEEL that makes sailors excellent.
- There are two associated words or terms only needed.
Let’s get onto it!
The one correct angle of the sail to the wind gives you power.
There is ONLY one correct direction of the sail relative to the wind …
… when the sail was luffing and has just been pulled in to get rid of luffing.
See how the boat sails at all different angles to the wind, but the crew adjusts the sail to stay at that one correct angle for every diagram except the last one on the right. The rule is always the same … every sail in the diagram below is at the same angle to the wind except the last.
The direction of the boat is irrelevant – the method for making it move stays the same.

Ease sail to luff – Pull Sail In to remove luffing – feel the power KICK.
At some point you will ease the sail and the safety knot in the mainsheet will stop the boom from going out further. And that is OK. The boat is going close to directly away from the wind. And you have trimmed the sail correctly for that direction of travel relative to the wind.
The logical flaw of the complicated points of sail is that sail angle is explained relative to the boat direction. This is useless for learning to sail.
How often to adjust the sail to maximise sail power?
In the beginning I recommend every 10 or so seconds. It is so easy for the sail to be oversheeted and go slow for a long time if you don’t check.
RULE 1 – If in doubt – ease the sail until you find the luffing then adjust to get rid of luffing.
RULE 2 – Read Rule 1
Over time you get a good feeling for when the boat is in the groove and feeling the KICK.
A sailing lesson with TWO Points of Sail instead of 5 or 9. And you don’t need to remember terminology.
The names come in useful later – but they are not functional in terms of teaching you to be a better sailor. They are useful in bar discussions and other discussion. Not useful for the basic art of sailing.
The dreaded circle diagram is now simplified.

Note that all positions the sail is adjusted to be at the one ideal angle to the wind.
I have left the Wind Direction off the drawing on purpose.
We find Wind Direction with the sail because THERE IS NO CONSTANT WIND DIRECTION.
We have to adapt continuously.
Don’t worry it becomes automatic with practice.
Lets look at the three zones
- Red Zone – Not sailing. Sometimes called “In Irons” or “Head to Wind. Sometimes you may go backwards.
- Blue Zone – Upwind – Helmsperson changes angle/direction of boat if wind direction changes.
- Green Zone – Everything else – Sail changes angle as wind direction changes until the safety knot stops the sail from going out more.
Red Zone – “In Irons”
We need to know how to get the boat moving again if the sail is flapping and the boat is going backwards.
Below a video showing the method. From the Yachting New Zealand video series.
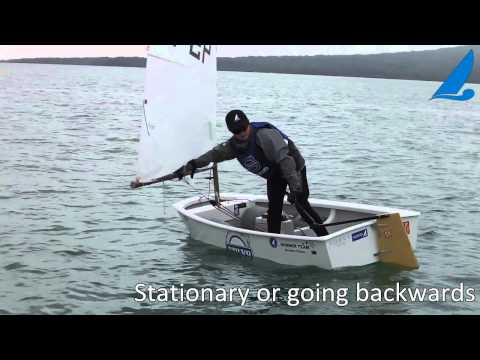
Video image can take a moment to load.
Tiller (steering) goes to the same side as the sail and the sail is pushed forwards to fill up the Wrong way from normal.
The boat will follow the direction of the back edge of the rudder.
When sail you are pushing out starts flapping or the boat is near parallel to the wind waves then pull the sail in gently and steer in the opposite direction.
If you pull the sail on too hard the boat will often go head to wind again so be gentle with the sheet until you have some speed.

Blue Zone – “UPWIND”.
As we have seen, when going upwind, the sail is kept at the same angle by steering the boat.
Let’s see what this looks like. We have seen that changing the angle of the sail has a maximum power position – the KICK (diagram right same as the one above).

The sail is held at the same angle to the boat in each drawing – because the sheet is not adjusted. (this will be changed in the next upwind unit. But just to understand for now. These are exactly the same sail drawings as just above but with the boat hull and crew added in.
So if the boat is being steered and we see some luffing – what do we do? THIS! (Just by the way – often people think these diagrams mean it is a race – no … it is one boat but two situations.
The boat direction is changed to put the sail at the one correct angle to the wind

Left side of diagram above. We steer down until the luffing disappears and we get the KICK. This is quick to fix. This is the best method.
Right side of diagram above. Alternatively, if the boat feels very sluggish because of steering too low, we can steer up until we see a little bit of luffing. Then if we see the luffing we steer back down until the luffing just disappears and we feel the KICK again. There is a better method than this in the next upwind unit – once used to this basic method.
Luffing the sail is the test for finding the KICK.
The next upwind unit talks more completely about unsteady winds and how to handle gusts and wind direction changes in a smoother way than this.
The biggest single improvement in the next unit is by using both steering and sail trim TOGETHER going upwind to give much greater safety when the wind is strong and gusty, greater capacity to get where you need to go and more speed as a useful byproduct.
The link below is the next step for upwind.
This is the step after the upwind section above.
Green Zone – Everything Else.
We really have covered this. But one more time to show the process.
We will use the exact same sail diagrams but add in the boat hull and crew. . Green zone is sometime called “Downwind”. But just know it is everything apart from going upwind or “in irons”. The sheet does all the work.

If you ease the sail to try and find luffing and the safety knot stops the boom from moving out further then that is OK.
The next downwind unit about Reaching and Stability talks about unsteady wind conditions. When there are gusts and how to handle them with much less stress.
The Big Secret about “Natural Sailors” and finding sail power.
Sometimes you hear someone say that some guy or gal is a “Natural”.
Their steering is very constant – they don’t seem to steer up to make the boat luff at all – but the speed and angle is really nice compared to the other boats nearby.
What is happening is this person has got used to feeling the KICK zone directly. They have spent enough time that they know what it feels like directly. They don’t need to luff to find it.
We can feel it too because we know what to look for. Ease the sail – see a little luffing, pull it in to remove luffing – feel the kick.
If you start feeling the kick as the sail is eased, before you see the luffing … then you don’t actually need to ease the sail more to luff it … just stop in the KICK zone.
You will feel the kick just before the sail luffs – a good thing to practice the feeling of.
You can be a natural sailor too.
All our Sailing Lessons
All Free Online Sailing Lessons – Index
- Sailing Upwind with less effort
- Increase confidence in Stronger Winds
- Downwind with less distress
- Gusts, Gybes and tacks easily
- Not hitting other boats and more
Our Sailing Boat and other Plans
Click on plans – top left of menu near top of page.

