Lightweighting a classic design by building a balsa strip canoe with light glass to the Henry Rushton Wee Lassie design. Would it end up in a dumpster after a year?
Answer …it lasted and was sold two years later.
Rushton Wee Lassie (offsets from book “Rushton and his Times in American Canoeing”).
Balsa Strip Plank
Light Glass
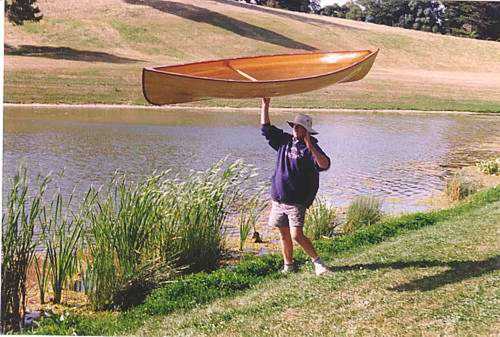
Weight – 12 lbs 5.5kg
Length – 11ft (3.3m)
Main takeaway points:
1/ Don’t reduce timber strip thickness; reduce glass weight, reduce timber density.
2/ Actual weights and sizes listed below.
Article – Lightweighting a 16ft Plywood Canoe 15kg (33lbs) – Method
Article – Lightweight Paulownia Timber resources
Origins of the Balsa Canoe Project
During work experience for my Engineering Course, now a long time ago, I ended up working for AdhesiveTechnologies. Then in Sydney – the National agents and manufacturers of “West System” Epoxies.
.The proprieter, Arnie Duckworth was at the time involved in building “WILD WEST”. A 10 metre derivative of a Jim Young Rocket design.
It was built of Balsa strip plank sheathed in ‘glass with small amounts of Carbon Fibre. How a timber that you can crush with your fingers can create a stiff but still light structure.
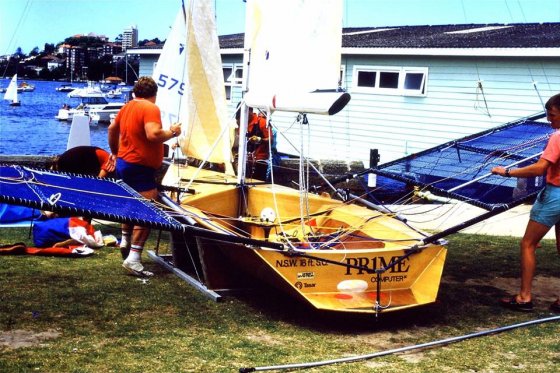

Skiff Moths fed Into the thinking about lighter and simpler 18s, their response …
At the same time Julian Bethwaite was developing his two handed “Prime”:18 ft skiffs.
A radical change for the skiffs. Dramatically reducing hull drag lower volume hull shape and a lightened and simplified rig. When I saw one of these at a boat show I was amazed not only by the smallness of the boat relative to its peers but just how beautiful the balsa looked.
Inspired by these developments the Australian Moth Association launched a series of very fast and very pretty balsa planked skiff Moths.
This is a slightly sad photo of one of the originally very beautiful balsa skiff moths. About 20 years after the fact.
The Rushton Wee Lassie – Making the lightest lighter
One of the great American canoe builders at the turn of the 19th Century was J Henry Rushton. One of his best designs is the Wee Lassie. A single person canoe which has beautiful hollow lines in the ends and a straight keel line.
There is no small amount of controversy about what lines are the correct ones – there are several different versions. I was very pleased with both the paddling characteristics and appearance in the book “Rushton and His Times in American Canoeing”.
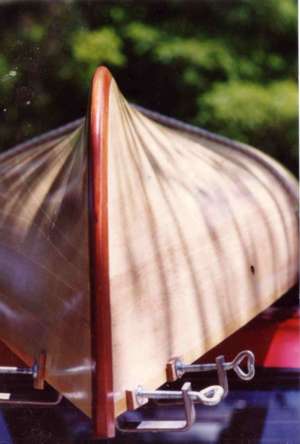
It has a deeper forefoot, a touch more sheer and a greater hollow in the entry than some of the other “versions”. The finlike forefoot gives the boat a great grip on the water. The result that for a short boat it has excellent directional stability. It is unlikely to be knocked off course as the waves and wind pick up.
A surprise source of Balsa – now comes the canoe experiment
About three years later I was working with Duck Flat when we made contact with a company called “Australian Balsa”. They were planting Balsa in Northern Australia. Basically they found that the further North you went the better it would grow. I think their plantations ended up in New Guinea.
I took advantage of this connection to order some pre-milled strips 7mm thick and approx 24mm wide after cusp and coving.
Playing with a light canoe and light materials = superlight!
The greatest fun for me in boats is to put together a concept that matches construction, materials and design into a unique package.
The idea, in this case was to play with the materials to build something REALLY light. I was not particularly interested in the durability of the boat.
As far as I was concerned I was going to be happy if it lasted a couple of years before being chucked into a dumpster somewhere.
So I decided to go as light as I dared with the fibreglass cloth used to sheath the balsa. And fairly minimal with all the timberwork.
Scantling Sizes for the Balsa Wee Lassie Canoe
(25.4mm to the inch)
- Balsa Strips – 7mm (just over 1/4 inch)
- Sheer strip – cedar or paulownia (one piece each side)
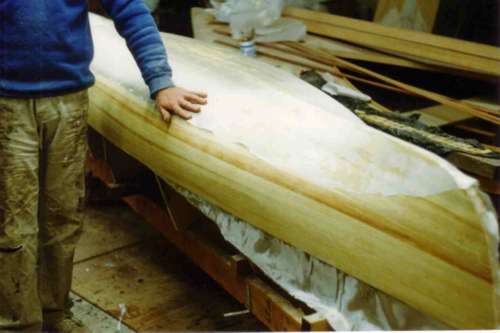
- Fibreglass cloth – 75gsm (2oz) – which looked more like tissue paper. Doubled on bottom as per photo above, and on inside only in the traffic area.
- Gunwales – 8 x 14mm
- Inwale Spacers – 10 x 6mm
- Inwales – 10 x 5mm
- Stems inner and outer – laminated to 22mm thick
- Keelson – 6 x 8mm hardwood.
- Spreader bar – 25 x 25mm
Rare Find – some Australian Red Cedar – Light Classic Boatbuilding Material
I had a bit of good luck with materials. My intention was to do all the trim in Australian timbers. OK, the hull was a South American timber, but at least it WAS grown in Australia. At Duck Flat there was a small piece of now rare Australian Red Cedar. Just the right length for all the sheer reinforcements. The keelson was a sliver of Jarrah out of a floorboard – an incredibly hard hardwood with a tight curly grain. For the spreader bar and internal stems I did use some lovely fine grain oregon (Douglas Fir).
In Australia we have a range of timbers that have colour and grain that are almost unbelievable to Americans and Europeans. I’ve seen visiting woodturners go glassy eyed at some of our timbers. Every timber makes a statement about colour and grain. The downside of this Woodie Wonderland is that most of our timber is hardwood of quite high density – not ideal for building lightweight boats. So thus my slip toward the Fir for the spreader bar.
Learning Curve – Fun with Cyanoacrylate and balsa strip planking!
The balsa was only 9ft long so had to be scarfed. As it was being sheathed glass I decided the scarfs could be quite short. I used 2:1 and because of the faint grain of balsa the cut could be in the 24mm face.
There was an incredible piece of luck in joining the balsa. While I was setting up the strongback we had a fellow drop into Duck Flat who was a model builder. He told me about “ZAP” a cyanoacrylate glue (ie superglue) formulated specifically for balsa. There were two types. One for gap filling and the one I was interested in for bonding of tight fitting surfaces.
- I got hold of a bottle of ZAP and it was the best fun I have had boatbuilding.
- Overlap the ends of the two balsa planks to be joined
- Cut a scarf with my trusty Japanese backsaw – a perfect fine join results
- Hold two sides of scarf together
- One drop of ZAP along the join – hold 5 seconds – a small puff of vapour
- Turn over planks
- One drop of ZAP on other side of join – ditto.
- Try and break – “HEY ROBERT, LOOK AT THIS!” …
… A Piece of Cake
(I did try ZAP on other timbers but it didn’t work so spectacularly)
Learning Curve 2 – Staplers make a big mess of cedar strip planking – nails are neater
Planking was not straightforward.
The Balsa dented badly when I nailed it in place. So I ended up cutting strips of thin plywood to bend down and nail through them. Generally I tend to use a single nail through each plank at each temporary bulkhead position.
The single hole to me is neater than the cluster of small holes that you get when using staples. Plus the staples had little power to hold the balsa down without tearing the strips. One nice thing about balsa is after the nail is removed you can brush the area with water. The grain swells virtually hiding the hole. Also effective if the hull is dented accidently – for small dents anyhow.
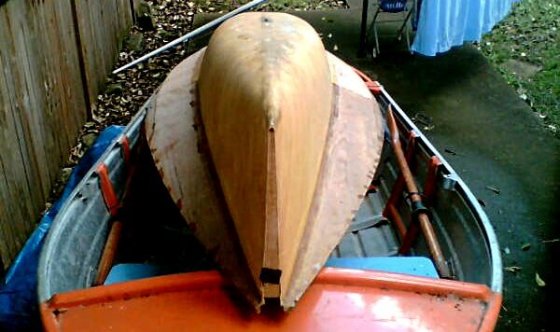
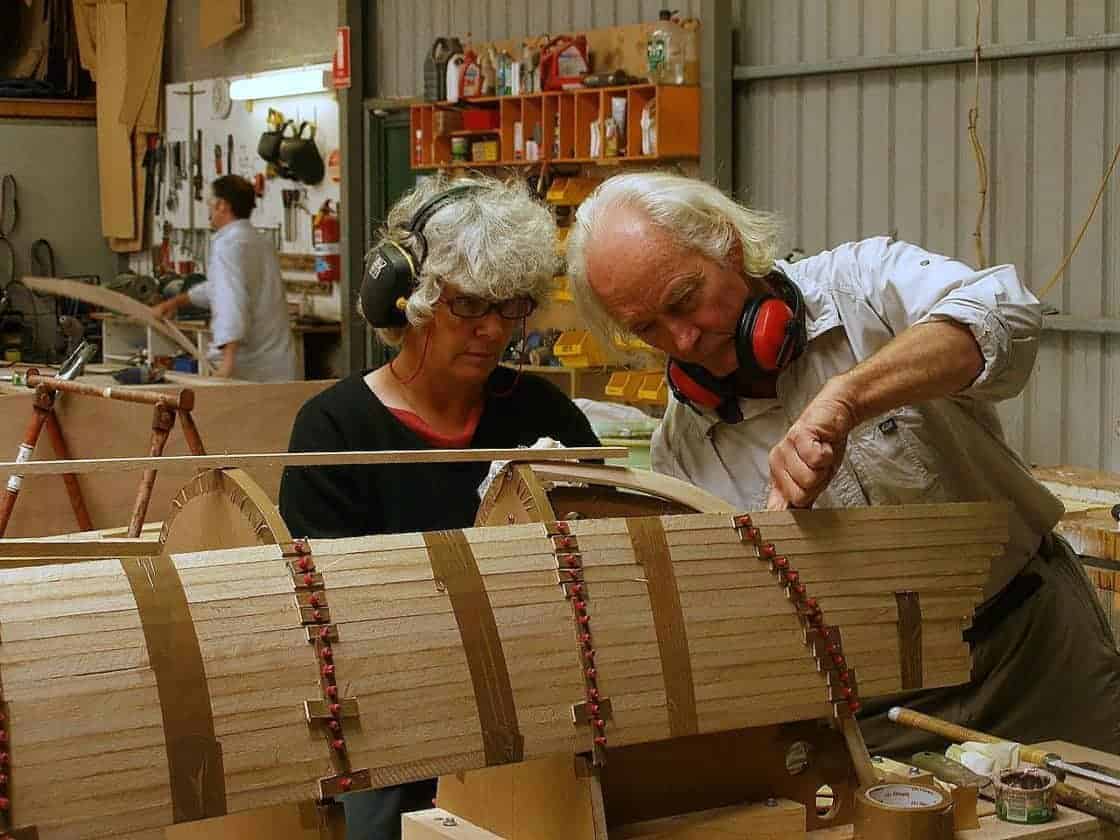
The photo below is not the balsa canoe, but one built of paulowinia. But the need to use ply pads is the same to distribute the load. Simply make a long strip, cover it with packaging tape and then cut it into pieces. The 2″ long flat headed nails have a small piece of plastic tube threaded onto them. Making it easy to pull out the nails later.
I’ve always preferred using nails rather than staples. The pressure a nail can exert is always enough. But with staples it is sometimes required to put in several which leaves lots of little dark holes. I certainly prefer the regular holes of the nails … after all … the history of boats is the history of making holes in wood to hold the boat together. “Boatbuilding with no holes” has nothing to do with our tradition.
As a glue between the planks I used Bote Cote Epoxy with white Q-cels mixed in. Thus providing an easily sanded join. If the glue ends up a lot harder than the planking it will end up proud of the hull after sanding.
I started planking at the sheer but on such a short boat the strips in the ends of the boat start swinging upwards (boat upside down) as planks are added. Because it is a shorter distance from sheer to keel at the ends of the boat than in the middle).
As the angle got more and more crazy I decided to cut the planks parallel with the keel and start a second run of planking.
The hull sanded up very nicely by hand. Glassing went spectacularly easy – such thin cloth wets out with epoxy very easily. For second layer of glass in bottom area – no squeegee – just run a gloved hand over second glass layer. One additional coat of epoxy rolled just as the first coat went tacky filled the weave easily. Same too for the inside of the boat.
Fitting the Timber Trim – choose nice timber and go small!

Learning Curve 3 – Make top edge plank of a higher density timber – cedar or Paulownia
From the first boat here was a small tendency for the glass delaminate from the soft balsa along the edge of the sheerline only. There was no real way out of this for this first boat.
A second boat that was sent to Japan we made the plank adjacent to the sheer out of a slightly higher density timber. A good choice now would be Paulownia. But any timber that is a similar colour to balsa and light (eg cedar, Paulownia) would be a good choice.
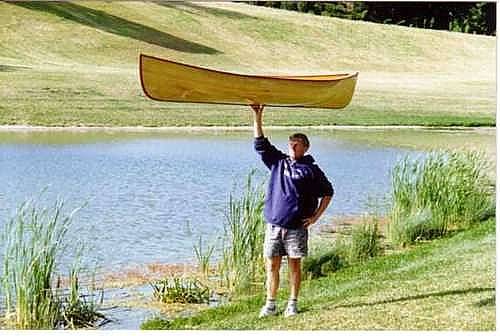
Weight much less than the original Wee Lassie.
Well the balsa boat weighed in at 12lbs. It has been reported that Rushton’s Wee Lassie was 22lbs. But there was a special ultralightweight version available at about 18.5lbs. So it has taken a century to remove 6lbs.
Modern materials allow us to eliminate all of Mr Rushton’s close spaced ribs, all the copper fastenings that held the plank edges together.
Conventional clinker (lapstrake) construction overlaps the planks and fits rivets through the two layers.
Rushton used a method of bevelling the two planks so that there is only a total of one layer doubling of the hull in that area normally carrying the weight penalty of double thickness. The fasteners were clenched through the two layers. Incredibly sophisticated and skilled construction using only the finest materials.
I wish I had the skills and patience to build boats like that – but I won’t heartache too much!
This construction is an interesting comparison with the Geodesic Ultralights, Featherweight boats and others that are purported to be light weight. My feeling is that most people hugely overestimate the structure required to carry paddling boat loads. Expedition boats are one thing – and these sorts of light weights are irrelevant in the world of surf and rock shelf landings. But that is not what ost people actually do. Lighter timbers and lighter glass weights can make a boat much more useful for most of us.
I am bemused when builders cover the inside and outside of a plywood hull with fiberglass or carbon. You can get a stronger and stiffer hull using slightly thicker plywood and save about 25% of weight and about 30% of labour. The joins will be just as strong with glass tape.
It misses the point that stiffness is mostly the responsibility of core thickness.
Paddling – Rushton was a Genius!
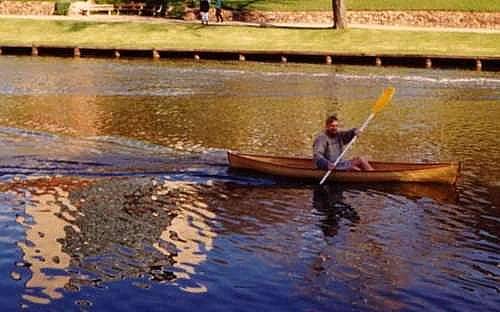
What a revelation it is paddling this boat. After the final coat of varnish had dried I carried (ha) it around to the municipal lake in Mt Barker for a quick paddle. The lake is quite small. Bbut it was amazing to feel the bow rise and fall over the tiny ripples on the water. The light weight gives a fantastic sense of lightness on the water.
On larger expanses of water the boat was a dream – tracking well in adverse conditions, astoundingly easy to move along briskly. Speed is limited by the short length, but the feeling of speed from the liveliness more than makes up for it. Effort to paddle is quite minimal.
The boat has enormous directional stability because of the fineness of the ends. The narrowness of the bows provides a fin at each end of the boat (see the bow-on detail picture above). For such a small boat she is quite hard to turn. But when the conditions are not so nice and there is still a lot of ground to cover she is perfect.
Using a very old canoe plan for a modern strip plank canoe
Where I found the plans for the Wee Lassie for strip planking in balsa, paulownia or cedar.

The plans I used are in the back of the book “Rushton and his Times in American Canoeing”.
There is some controversy about whether the offsets shown there are the original Wee Lassie offsets. But I can only say they make for a very pretty boat. The voluptuous shape does make for an “interesting” plank layout as the girth is so different from the height of the ends. So it is likely that two strip plank orientations will be needed (which I think I covered on this page.
Quick and dirty method for setting up strip plank canoe moulds where the offsets may not be accurate.
I don’t think the offsets were super accurate so I use a quick and dirty method of fairing in 3d.
When there are doubts about fairness I use this method with setting up moulds strip planked boats.
It has even allowed me to scale up quite large boats from tiny drawings in old magazines and books. By quite large I have used it for canoes up to around 18ft and sailing dinghies up to around 16ft. Bigger than that and I would probably loft the lines traditionally or on computer as it is so much labour and materials I would be nervous about making an error.
Set up the moulds and run a batten over the moulds. Plane down the high spots and mark any low spots with a dark marker on the mould controlling faces. When bevelling the moulds. some of those low points can be supported by the non-controlling side of the mould. When one side is too high the other side will be too high too. Mark it and then go over it later as it is easier to work through one side at a time. At least I think so!
Then the strip plank can still be nailed to the mould but not hammered down to the mould but eyeballed to look nice and fair. It works pretty well.
The balsa building method can be applied to any of the classic canoes that offsets are available for. The same book has the offsets
Just how Durable was the Balsa Strip Planked Canoe?
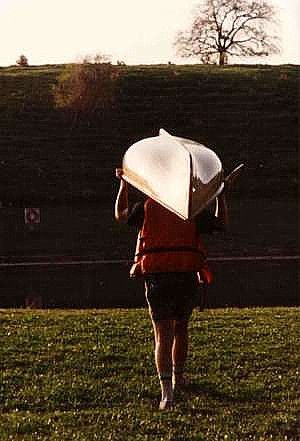
Over time I was able to use the canoe for picnics and camping. As one of the most beautiful marine objects that you will ever see (J Henry Rushton’s work – not mine!) – it attracts a lot of interest particularly when you suggest onlookers pick her up.
But use also means risk from hitting or abrading other surfaces. Most of this was avoidable by always placing the boat upside down on the ground when not in use. And only placing it upright on grass or other soft surfaces.
I didn’t treat the boat with kid gloves. But did usually remain conscious of where it was put (and how much wind was blowing – it did blow away once or twice)
Over time she did get a few bumps. The most common problem which happened 4 or 5 times was putting the boat down on a stone and making a small puncture in the outer skin – maybe 6mm (1/4″) across. These were easily filled with epoxy and Qcels which finished up much the same colour as the balsa. Fairly imperceptible.

Why are Strip Planked Boats built with heavy Glass weights if 2oz/4oz was able to protect a balsa boat?
The biggest learning is if such light glass is enough to protect a dentable timber like balsa then why are we using 4oz cloth on the more durable Paulownia and Cedar strip boats?
Given that 90 percent of boats have relatively gentle lives and the balsa canoe did way better than just survive .. then why?
I would go for 2oz with an extra layer where there might be foot pressure inside the boat. And also an extra layer outside where the boat may lean on the ground.
Glass is the heaviest material in strip boatbuilding (and has to have the same weight of resin added) but strangely most think of reducing the wood thickness … which reduces the I-beam effect very quickly. 6mm strip planked boats are over twice as stiff as 4mm thick.
Go for lighter glass, a lower density timber for the strips BEFORE thinking about reducing strip thickness.
Go all out with glass, carbon and kevlar for expeditioning boats that will do surf landings onto rock shelves … but why make 90 percent heavier than they need to be?
As for glassing PLYWOOD … this is way overdone.
Often on the premise that there is an ‘I-beam” effect.
This is poppycock as the plywood already is an I-beam.
I have an article about this misconception that leads to too much glass using the cabin catamaran the Jarcat as an example.
Yes … same thickness ply and lighter glass than most plywood kayak kits.

It’s way bigger than a kayak or canoe. But is built of 4mm ply with 70gsm 2oz cloth on outside only. Why are we being progressively led to believe that little canoes and kayaks of the same thickness ply need 4oz 150gsm cloth. INSIDE and OUT!?
More on the remarkable Jarcat and lightweight glassing here.
Comparison with Composites – The balsa is lighter and looks like wood!
The funny thing is that production Wee Lassies in full carbon composite or Kevlar composite have list weights of around 14lbs. And here was I working in a garage with wood and standard glass producing a lighter and probably stiffer boat. Because of the small spans and high curvatures involved there is no visible deflection with quite high hand pressure on the flatter sections of the panels.
This may be because the panels are so much thicker than the normal composite setup plus the balsa strips add considerably to the structural stiffness. Normal cores add very little to the stiffness whereas the balsa strips are real wood with real bending stiffness.
Of course the balsa canoe will be a lot more labour than a properly tooled composite boat. After all that is what you are paying for with a production boat. But this method does bring exotic composite like weights within the range of homebuilders. Particularly for small carryable structures like this.
I think another advantage would be the possibility of doing almost invisible – actually COMPLETELY invisible repairs with this construction – and you can do it at home too. Whereas most people will have to return a composite canoe to the manufacturer for repair.
Conclusion about the Feasibility of Balsa Strip Canoe building
After 5 years of use I sold her in Sydney for a useful amount of money. So my “virtually disposable” boat was a great deal of fun – a great boat to stir people up when they say that fibreglass boats are lighter than wood – even the more common 16ft (4.8m) Western Red Cedar strip boats are around 50lbs (22kg)- half the weight of a fibreglass boat of the same capacity.
And Plywood is better still for lightish but fast building
But Balsa Strip Planking is King for lightweight!
Hello,
I was wondering what formers/offsets you used to build this canoe? I can’t find a matching set of plans on your site.
Hi John,
The article is more about the method. Offered as a public service.
The plans I used are in the back of the book “Rushton and his Times in American Canoeing”.
There is some controversy about whether the offsets shown there are the original Wee Lassie offsets. But I can only say they make for a very pretty boat. The voluptuous shape does make for an “interesting” plank layout as the girth is so different from the height of the ends. So it is likely that two strip plank orientations will be needed (which I think I covered in the article.
When there are doubts about fairness I take a quick and dirty method with strip planked boats. Set up the moulds and run a batten over the moulds. Plane down the high spots and mark any low spots with a dark marker on the mould controlling faces. When bevelling the moulds. some of those low points can be supported by the non controlling side.
Then the strip plank can still be nailed to the mould but not hammered down to the mould but eyeballed to look nice and fair. It works pretty well. It has even allowed me to scale up quite large boats from tiny drawings in old magazines and books.
Hope that helps
Michael
The balso building method can be applied to any of the classic canoes that offsets are available for. The same book has the offsets