This is a basic section on the stages of fibreglassing areas on a plywood boat, canoe or SUP. Many problems can be avoided by being methodical and setting up each stage carefully rather than rushing in.
We find quite light glass works well for many small boats up to 16ft. Heavier is not necessarily better in practice. And lighter cloths are easier to apply.
If you epoxy doesn’t go hard – it has been badly measured or badly mixed then there may be problems. Our page on epoxy curing problems is worth a read.
Epoxy going off too fast is a problem with technique rather than hardener choice
Epoxy Hardener speeds make less difference than beginners think. If running out of time it is usually a technique problem.
Epoxy sitting in a container gives you 5 minutes plus or minus 5 in the pot
Epoxy spread on the surface of the boat – 20 to 30 minutes
But don’t plan to work in directs sunlight!
The Difference between Professionals and Amateurs is that professional take more time BEFORE the job.
The difference between professionals and amateur builders is organisation.
They understand that Time comes from having a streamlined assembly process. That is covered in the plan and appendices of my boat plans.
For building process we base our work on on dry assembly then disassembly and getting the glue out on the surfaces quickly.
That way you have 20 to 30 mins to do the assembly. Same for fibreglassing.
If dabbing around with little brushes the necessary time is wasted. Also holding a can and dipping the brush takes forever.
- Choose tools that work fast
- Get the epoxy out of the mixing container and onto the surface quickly
- Don’t try to be perfect until the container is almost empty
- Make smaller mixes but keep a wet edge moving along the boat
So what are the right tools?
Choosing the right tools for glassing or epoxy coating a boat fast
Make or buy a squeegee and give a brush a haircut
Measuring epoxy
During the building there was a chance to practice using weight measures, volume measures or calibrated pumps.
If the weather is cold and the pumps are slow then warm the epoxy a bit.
If your pumps are too slow get an electronic scale or move to measured cups so you can pour.
Making a squeegee

First tool is a squeegee. It might be a cheap window squeegee. Or a rubber purpose bought squeegee of a decent size.
If you cannot get either of those then a piece of plywood will work.
Choose a plywood offcut that has a straight edge from the original sheet. Cut it around 250 mm (10 inches) wide and make another about 150mm wide. The other dimension is good at around 100mm (4″) to keep your hand reasonably far away from the work.
Sand the straight to remove any roughness or loose fibres.
Round the extreme corners so they don’t drag and pick up the fibreglass fibres
Give your brushes a haircut and have solvent handy to sit them in

Going backward and forwards into a small tin with a small brush is mad. Something like an ice cream container is good.
Normal brushes are way too floppy. A great tip is to trim the bristles down to about 25mm or an inch in length.
Long floppy bristles hold too much epoxy and are too floppy to make the viscous resin move around.
Trimming them makes them stiff to
- Push the epoxy around
- Apply it in modest amounts
- Remove it where necessary.

Gloves for boatbuilding
Gloves are good for big fibreglassing jobs. They do tend to get messy. Plus can get a clean start by ripping them off and putting clean ones on.
The normal rubber gloves are OK. But better are Nitrile gloves – which are just as thin as rubber but less prone to splitting and tearing.
And they sure are such an attractive blue!
Overview for different Fibreglassing Techniques

Fiberglassing larger areas is done differently from small areas. Large areas require that the glass be draped dry over the surface then the epoxy is applied over the glass and worked through the surface.
The example here is glassing a centreboard but the principle is the same for much bigger areas like the bottoms, sides and decks of bigger vessels.
Where not to use this method for Fibreglassing a boat – stitched cloths, heavy cloths, Biaxial, Triaxial
The exception for the dry method application of the glass is with some heavy “stitched” cloths like biaxial and triaxial.
If hand laying up these thick heavy cloths it can be hard to get the epoxy right through the cloth.
Sometimes with moderate sized areas it can make things go smoothly to precoat the surface – but if the precoated epoxy goes off or you are not organised in laying out the fiberglass smoothly a gigantic mess can result.
If you haven’t done it before assemble a team including one person who has the full time job of just measuring and mixing resin.
Do any Detail Fibreglassing on tricky areas first
(See the section on use of double bias tape)

Do it, allow to cure, sand it and feather the edges ready for he rest of the glassing.
Draping fibreglass dry over the hull or other component
So talking standard small boat weights of woven cloth here – no fancy weave or stitched cloths – and weight under 15oz (500gsm).
The glass is laid over the area usually with the assistance of gravity.
Pull the cloth around so it covers the area you want. If it threatens to slide off the surface I use a few pieces of masking tape to hold in position.
If you want to rough trim the glass to shape you can at this point, but be aware that the glass might move a bit while you are working it so I would leave a good margin or plan to trim off excess later when the epoxying is around 80% done.
Setting up a centreboard for Glassing with a logical orientation
Some components need to be held or positioned to do the work. With a centreboard or rudder a long screw or nail each end can allow the workpiece to hang.
Then there is access to both sided to do the glassing with one piece of glass wrapped around the leading edge.
I usually set the foil up with the leading edge facing upward by running long drywall screws at least 25mm (1”) perpendicularly into each end of the foil.
Long screws make it easier! 8 or 10 guage and need to go into the timber 3/4″ (20mm).
The screws need to be about 50mm (2”) behind the leading edge. The screws can then be placed between two sawhorses with the foil suspended between them.
The gap between the sawhorses and foil needs to be no more than 12mm (1/2”). Place a piece of scrap timber over the heads of the screws and clamp it to the sawhorse (or screw it down with a couple of screws so they cannot slide off
Remove the Selvage edge
One thing to be aware of is the selvage edge.
PIC BELOW – If you look at the manufactured edges of cloth off the roll you will see two or three fine threads that look different from the other threads.

These are to help hold the cloth together. They don’t go clear when epoxyied and will also leave a line in the surface when sanded. So find the end and pull them out of the cloth sideways – they have done their job. it is not necessary to remove them if they are going to be trimmed off later.
The principle of a wet edge of epoxy moving across the boat or component.
With Fibreglass it pays to work from the middle. As all your work will push any wrinkles out to the ends of the boat. It doesn’t mean every squeegee stroke is towards the ends of the boat. But every strong one would be.
Here is a plan view for a 16ft boat – a design for a slipper launch that was never completed. Start with smaller amounts of epoxy and as you get a feel for the job increase the amount of epoxy mixed.
Note the conservative start in area 1. And increasing areas with more confidence.

Put first coat of epoxy onto the fibreglass.
I have covered the all you need to know above. With a centreboard or rudder can do one side at a time.
Mix epoxy and stir it correctly and POUR most of it onto the surface.
Spread with the squeegee working down to the open edge of the glass and slowly towards the ends. If have to go the other way be more gentle.

If it is a boat focus on your first area. Don’t be too ambitioous to get everthing perfect – just 90 percent perfect – this keeps the process fast. The final 10 percent will be tidied up with your short haired brush.
The aim is for the glass to be clear, rather than white …
And to be able to see the fabric texture.
If the surface is smooth it means too much resin and the glass is probably floating in the resin – MESS
As you get to any pieces of masking tape you used to hold the glass in place just remove them.

The glass will go clear when the epoxy is rolled or squeegeed in properly. Add only enough epoxy to do this – the texture of the cloth weave should still be visible.
Fill the weave step by step or there will be runs down the hull
Wait for the epoxy to go sticky – if more epoxy is added before the first coat has become sticky the glass will float up on top of the epoxy and the foil won’t finish smooth..
Roll a coat over the glassed surface. If the roller is held so it cannot turn and lightly pulled across the epoxy it will smooth the surface – as you do this the cloth has to be kept tensioned by working from the middle out to the ends and from the front to the back.. When it goes sticky roll on another coat, skid the roller to smooth the surface. Continue adding coats as the previous one goes tacky until the weave is filled. Runs may occur if you don’t allow the previous coat to go tacky enough. With 200gsm (6oz) cloth usually there are a total of three to four coats of epoxy required to fill the weave.
Trimming the glass around the edges of the boat or centreboard when the epoxy is cured
When the epoxy is cured (usually overnight) the excess glass can be trimmed off. Work carefully around the foil trimming down excess to a few millimetres. The final trimming will be done with sandpaper and a cork block. Keep hands well away from glass edges. If you drag your skin along a raw glass edge it might cause a cut.
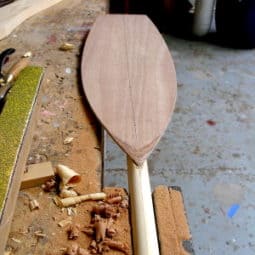
Final Finishing of the boat, foil or other component

Some people say you can’t get a good finish with epoxy. While the epoxy should be painted or varnished to protect it from UV light and it is possible to get better finishes than epoxy with those surfaces the quality of the finish can still be good. In fact, getting a good finish in the epoxy saves labour when you move to doing the paint or varnish coats.

There are two pics right. The first above is the foil with a sanded epoxy finish lying to the left of an unsanded foil The second is of a final epoxy finish before a lighter resanding and painting or varnishing. The reason for the final coat of epoxy is to seal any glass fabric that is exposed during the sanding.
Caveats for stitched cloths, biaxial and triaxial
Biaxial and triaxial stitched cloths and rovings are very hard to get resin through. Also they are less likely to be distorted by laying them on a surface just coated with epoxy. So that is the preferred method. Otherwise applying epoxy from the outside of the draped glass will have problems getting through the thickness of the glass layup. Working with a wet surface makes it much easier to get the epoxy through the glass. So roll a quick coat onto the surface to be glassed. If it is very large break it into sections that make sense from the panel sizes of glass you are applying.
More Resources for How to Fibreglass Boats, Canoes, Surfboards and more
Glues – Epoxy vs Resorcinol – short answer
Glassing – Epoxy Resin vs Polyester Resin – short answer
Preventing Rot Pt 1 – The Good, the Bad and the Fugly
Preventing Rot Pt 2 – Epoxies that “soak in”
Eliminating Screws and other Fasteners – save money and do a better job
Are 1 to 1 (1:1) Epoxys any good for boatbuilding