
How Rick built a boat in 4.5 hours + three sheets exterior ply
Rick Landreville is a Canadian and the fastest boatbuilder I know. He is an absurdly fast boatbuilder. He prototyped the Quick Canoe plan for me.
Rick’s fast building tips are really worthwhile for the rest of us …
He was using the detailed plan for the Quick Canoe 155 prototype.
A professional video of how to build the Quick Canoe
Trying new methods for simpler plywood canoe building
Some new building methods were used – at least to Rick and me. In particular using duct tape to hold the boat together rather than stitching or cable ties.

We all know about Stack Cutting ply.
I cut the third plywood sheet in half, then stacked the four sheets together and cut out all the sides at once.

Then separated the two upper sheets and cut out the bottoms at the same time. Pretty quick and easy this way. I think the pictures explain a lot.
Here are some pics. I spent 45 minutes laying it out, then had to go inside for Christmas festivities, then spent 20 minutes cutting out the parts, then had to go in again, then spent 20 minutes belt sanding all the parts and gluing in the butt straps on.
Rick.

Rick used a belt sander. to trim the sheets down to the line.
Good job shown here.
A belt sander will be quite risky for most people to use .. I recommend a plane. Rick got the belt sander for Xmas I think.

The next stage was to do the duct taping and control the width of the boat at the sheerline. Rick was a bit impatient with this and tried to fly through it rather than the methodical, more plodding method from the designer. He ended up having some trouble with the boat being too floppy. He took it apart and then followed the duct taping directions in the plan – and it worked.
This photo below is an Australian build by Cliff and PJ over a week for a boat festival the following weekend.
But it shows the beginning of the taping. and using masking tape to reduce mess.

The plans are Set up for epoxy or Alternative glues.
Epoxy for Longevity. PL-Premium (Rick has used others and found them less durable) for cheapness with less Longevity.
He was pretty happy if a bit unwell.
I have been sick with a sinus infection and a fever for the last 3 days, and have been flat on my back in bed. Today was an improvement, so I worked for about an hour and got it 3D.
Rick.

It is understood that many people might choose to go cheap with this boat, so while epoxy is preferred there is information about using the cheaper polyester resin – it doesn’t stick to wood as well so the boat will be less durable – but cheaper. Or using wood in the corners along with either epoxy or one of the alternative glues. Rick recommends PL Premium.
Perttu builds his canoe in Finnish snows and then takes it on a river trip – videos!

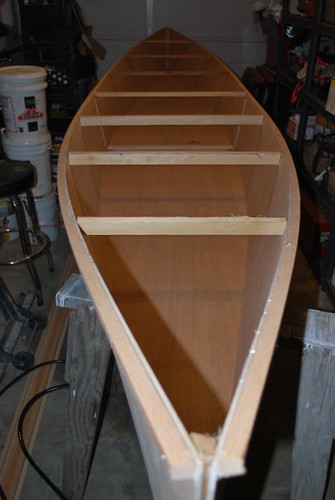
The reason it works is that the plywood side panels are spaced the right distance apart before the bottom is put on. Here you can see the spacers that were in place.
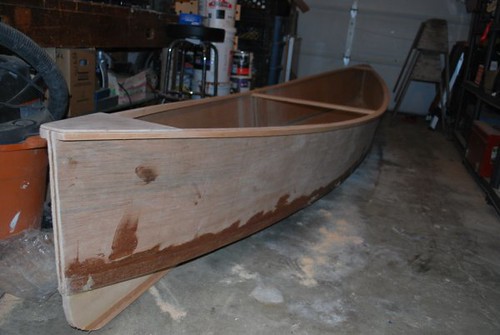
The Big Time Saver for glassing or epoxy filleting the seams – long clean join with no stitching makes it efficient
The reason it reduced build time is as opposed to stitching with copper wire or cable ties there are no bumps on the inside of the boat to work around. The interior is completely clear for either epoxy filleting or glass taping with 50mm (2″) wide tape.
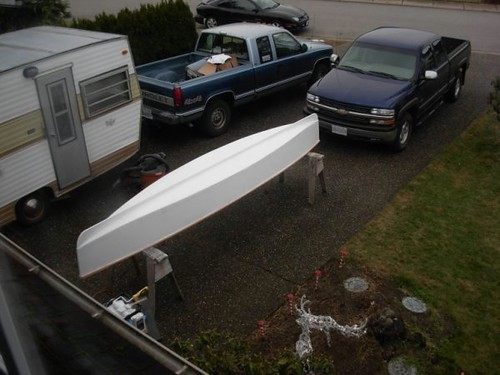
Painting – go simple or complicated?
Okay, I finished the plywood canoe today. (well, everything except painting it). I have a total of 4 hours and 25 minutes of build time, and anticipate another 4-5 hours to sand, prep and paint it.
But this is the dilemma; Do I just prime it and give it one finish coat, and not sand anything at all (keeping in tune with the ‘quick and dirty’ build)? Or do I spend a couple of days on it and varnish it up to a yacht finish? I tend to use my boats hard, and often. A yacht finish looks as crappy as a second rate job after a month or so…
Rick.
A couple of days later there was a break in the Canadian Winter and Rick and his girls tried it out on the local pond.

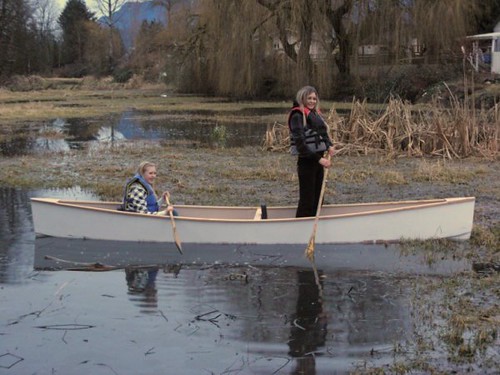
Rick got it out on some open water a couple of week later. He thought it tracked nicely for a travelling canoe. Still looks very cold to me!

The boat came out pretty lightweight at about 48lbs built of standard building trade materials.
The stability (not to mention floor space) will make it very suitable as a fishing canoe as well.
Plans are available from Duckworks for $40 from my agents. Duckworks has a good information piece up here plus the ordering info.
Several Canoes? Then you need a triple storage rack to build yourself
This is a Slideshow building the Quick Canoe in 4 1/2 hours – more links below that.

More Quick Canoes
The full story on the design and building of the first boat is here Quick Canoe General Information is here
Buy Plans For Quick Canoe
I really wish you had a 14′ one man canoe like the no longer available plans for the Bateau Cheap Canoe.
Please check your email. Bateau.com made the metric plans public domain in 2003 and I found a set. The only thing that seems missing is the length of the two extra spreaders for the width of the boat, but you can scale off the information they have given.
Michael
In the drop-in plans it simply says “Work out the final position of the partner and mark it.” (page 16). Eyeballing a position between the front seat and the spreader seems imprecise after cutting to the QC plans that specify to the millimeter. Could you give some advice on how far back from the bow to place the 150mm reinforced section?
BTW – my 11 year old son and I have just gone 3-D with the QC and both he and I were thoroughly impressed with how it went from floppy pieces of wood to something that looks like a real boat!
Many thanks
Hi Robert,
YOu can put it anywhere along the mid section of the boat really because the leeboard and the sail move together because of the design as one unit, but the best place is probably about 500 or 600mm in front of the centre spreader.
Hope this helps
Michael,
Thanks for your reply on the use of 4mm ply. After looking closer at your Quick Canoe Electric, this might be an even better use of my stray ply plus the river system by my location would be perfect for this type of craft/travel. No rocks, slow current and gentle winding turns without low hanging branches.
Thanks,
Is it possible to build one of these from 4mm? I just happen to have (4) sheets of Okoume BS1088 lying around with no plans for it.
Thanks, Jerry
Hi Jerry,
For smoothwater use it would be kindof ok. I wouldn’t plan on hitting rocks in fast running water.
One “Quick Canoe” was built of 4mm plywood here.
The bottom will not be stiff enough so you would have to put some internal stiffeners from ply going across the floor. Maybe 70mm wide by 50mm narrower than the bottom of the boat at that point. Ends should be a 35mm radius. This will allow water to move from front to back too for bailing or pouring the boat out. I would definitely make the gunwales and inwales both 19 x 19 to make sure the sides are well supported at the top edge level.
It certainly would make a lighter boat.
A number of the Eurekas have been built of 4mm and that works well with the narrower panels of that boat. And the Eureka is beautiful too. Though in that case instead of bottom stiffeners as described above several have used 2oz (70gsm) woven glass cloth to make them pretty tough. This replaces all the glass tape on out outside as you can use it to cover the bottom, the two bilge panels and 25mm (one inch) onto the topsides.
For a better comparison between the Eureka and Quick Canoe – same plywood … see here
Hope this helps.
Michael
Hi Mike
The electric canoe with drop in sail and outriggers, would you think that reasonable,
Am getting on a bit need to sit on aseat & steer with my feet while sailing
Love your work especialy little Beth
cheers
Vernon
It is a really reasonable approach Vernon!
I have suggested this to a couple of people. The electric canoe has a much better hull for high speed than the standard Quick Canoe hull.
Also it has greater freeboard so it will match the arc of the crossbeams better. There is a potential for a really nice sailing rig with a lot of power .. though the Electric Canoe hull would need a bulkhead in line with the forward crossbeam to take the loads if really pushing performance.
Also the OZ PDR rudder will work on a transom boat much easier.
I do have an extra page or three of drawings for a bigger rig for the drop in outrigger available free to purchasers.
Michael
More Storer Boat Plans pics on Flickr
Michael,
how would one of these go with the Hobie mirage drive?
Hi Neil,
You would have to work out a seat and a hole through the hull (and probably a rudder) but no basic problems apart from the boat perhaps being too floaty unless you are carrying some gear. It really is designed for two, but it depends on your usual payload.
Some tuning of the skegs at the front and back of the boat might be necessary. And probably use two spreader bars to leave the centre of the boat clear for the seat.
Also if the seat braces the sides of the boat would be a good idea.
Best wishes
Michael
Do you have any sort of estimate for the capacity of the quick canoe? I was hoping to build something that could hold about 550lb or more.
Thanks
Paul
Hi Paul,
550lbs should be no problem. we had about 480lbs in one of the boats on the recentt Loire trip and the boat performed pretty well – no sense of being overloaded and plenty of freeboard.
If you really wanted to you could add an extra foot in the middle of the boat using two buttstraps. That would make it more floaty by about 60lbs if you thought you were going much over the 550lbs you project.
Best wishes
Michael
Hi, It is a really pretty canoe. Much lighter than my old fiberglass one too.
CM
HOW DO I GET THE PLANS
Howdy Dave,
Look on the right side of this webpage – there is a list of agents for several regions. You can order from any of them online.
If you don’t want to pay online please email or write to any of the agents for a price on the plan book.
Best wishes
Michael
thanx
Hi Michael,
I am putting together an intergenational project for Canada Bay Council
in Sydney which will have teenagers and retired men working together to
build some form of sustainable transport. The main aim is to have fun
and while creating a mentoring enviroment.
There willl be two sessions of 5 – 10 young guys from high schools- and the same number
of seniors from mens sheds- in each session.
I’m thinking the simpler the better and the quick canoe fits the bill.
We will have ten two hour sessions run over ten weeks with an exibition
and awards night in June.
If I can appease the oh&s boffins we might even be allowed to put
them in the water and have a race day.
Are the printed plans that can be ordered just the same as getting the plans emailed and printing them out myself?
If we need to go for the cheaper construction and not use marine ply, what is the best choice of ply in the budjet range?
Sorry, so many questions!
I’m open to any ideas you might be able to add to help make it a
success.
Hi Mick,
The paper plans are the same as the PDF plans. There is a concession for projects like yours where two boats can be built for one plan fee – if that helps.
Ply will vary. Often you find Pacific Maple Marine ply (2440 x 1220) – it is not too bad. Beware of the otherwise wonderful OZ Hoop pine plywoods, the sheets are too small (2400 x 1200) without doing some figuring on how to fit the parts.
Exterior ply 6mm might be a go if you find one with good faces and inspect the edges to see how many voids there are in the interior veneers.
Best Wishes
Michael
The Quick Canoe is exactly what I’ve been looking for. Can I buy plans direct from you? I live in Johannesburg, SOuth Africa.
Great canoe. Looking very forward to building one, indeed.
cheers and thanks,
Paul
Nice blog!
This article is extremely fascinating.
I am sincerely admiring your capability to respond in a short time with such constructive advice.
Thank you a lot!
Thank you Bicknell,
We work really hard to try and get back to people as quickly as possible, whether it is a simple enquiry or some sort of building or technical problem.
Glad you enjoyed the website.
Have you thought about using a lazer light material one of the polycarbonate roofing products. In Australia Melbourne, in the 1920 people would make canoes out of galvanized roofing iron for a quick fish on a flat day on port Phillip bay. I have often thought of making one out of clear roofing sheets so I could see what was underneath. I am idea rich but time poor.
regards dominic
Hi Dominic, thanks for your comment.
I think you would end up idea rich, time poor and with wet clothes!
A lot of those materials are not very strong or very flexible for their weight. Most boatbuilidng timbers have a specific gravity (density) of about 0.5, but the plastics are often 1.0 or above. The result is either the boat is much heavier for the same stiffness or too flexible for the same weight.
The trick with the “corrugated iron canoes” was to hammer out the corrugations at the ends of the boat so they were flat and could be nailed to timber. Any gaps would be filled with tar taken from the road on a hot day.
I suppose it would be possible, but whether it would be worthwhile is another question. It would be fun to succeed at something like that. Floating in a transparent boat. There have been a few over the years, but mostly not successful.
That’s really what you can call a quick build!
In your opinion, how long would it take for a beginner to build this model? (assuming no experience at all)
There are starting to be quite a few of these built now. The experienced builders can start one weekend and have the boat in use the following weekend with work on one weekend then follow up work through the week.
The 4.5 hours is for the basic hull only. Painting can take not too much longer if it is a basic job or quite a bit of time if a good job with premium products is wanted.
However a first time builder would probably take double this time which is still quick. The big time savings are the very simple hull and using duct tape or gaffer tape to hold it together while the interior is epoxy filleted or glass taped. USA builders are getting them in the water for between $150 and $200
Many thanks! Orginally I intended to buy the Goat island Skiff, but I thought I would cut my teeth on the 155 first.
This is one of the places where building a trial boat makes sense.
Usually when people build trial boats they are too close to the final boat that they eventually plan to build. So it takes a lot of time and money.
However the Quick Canoe is so economical in terms of materials and labour that it does make a lot of sense as a first build. You will learn a lot about handling the epoxy and plywood so that the eventual Goat will be a much better job.
Also you have a boat to do some canoeing in while you build the Goat. I really am much more of a sailor, but I have started to like canoe touring as well.
Michael, How do I get your plans for the quick build 155 in the UK – Seawing Boats haven’t heard of it yet!
Hugh
Hi Hugh,
I have sent Philip at Seawing a copy. They have the plan available for you now.
Best wishes
Michael